Bumper Scuff Repair: Step-by-Step DIY Guide
Common Causes of Bumper Scuffs and Scratches
Everyday Driving Hazards
- Parking Mishaps: Tight parking spaces or miscalculations while reversing can lead to scrapes against walls, poles, or other vehicles.
- Curb Collisions: When pulling up too close to curbs, especially in tight spaces, bumpers often get scratched or scuffed.
Road Conditions
- Loose Debris: Small rocks, gravel, and road debris kicked up by tires can leave small chips or scratches on bumpers during normal driving.
- Potholes: Sudden encounters with potholes can sometimes lead to unexpected contact between your car’s bumper and the ground.
Weather-Related Damage
- Harsh environmental conditions such as hailstorms or wind-blown debris from storms can mark your bumper’s surface.
- Prolonged sunlight exposure may weaken the paint’s protective layer over time, making it easier for minor abrasions to occur.
Human Factors
- Collisions in Traffic: Low-speed impacts in busy traffic scenarios often result in bumper scuffs rather than major dents.
- Careless Loading/Unloading: Loading heavy items into a trunk without caution may accidentally scrape against a bumper.
Other Unavoidable Factors
- Shopping Carts in Parking Lots: A rogue shopping cart rolling into your parked car is a common culprit.
- Children’s Activities: Playing around parked cars with bikes or toys can sometimes lead to accidental scratches.
Preventative Tips for Avoiding Scuffs and Scratches
- Use larger parking spaces when possible to avoid tight squeezes.
- Avoid parking next to shopping cart return areas.
- Consider investing in rubber or plastic bumper guards that act as a shield against minor impacts.
- Use corner protectors if you frequently navigate narrow spaces.
- Slow down on gravel roads or construction zones where debris could fly up.
- Waxing your car periodically adds an extra layer of protection for your paintwork.
By understanding these common causes and taking preventive steps, you’ll not only maintain your vehicle’s appearance but also save money on repairs down the line.
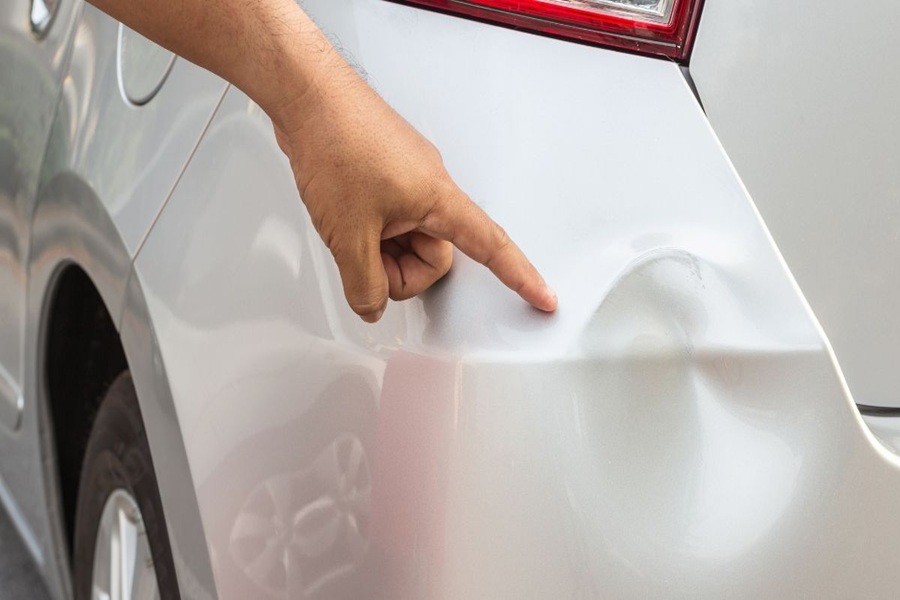
Assessing the Severity of the Damage
Before beginning any bumper scuff repair, it’s essential to evaluate the severity of the damage. Understanding the extent of the issue ensures that you use the correct methods and materials for repair. Neglecting this step can lead to an incomplete or ineffective fix, potentially worsening the damage over time.
Types of Bumper Damage
- Surface-Level Scuffs: These are shallow marks that only affect the clear coat or top layer of paint. They’re usually caused by minor contact with another object, such as a wall or another car’s bumper.
- Paint Damage: This type involves deeper scratches that penetrate through the paint layer and expose the primer or raw plastic underneath.
- Structural Damage: In more severe cases, there could be dents, deep gouges, or cracks in the bumper material. DIY repair methods may not suffice for structural issues, and professional assistance might be required.
Steps to Assess Damage
- Clean First: Wash and dry the damaged area thoroughly. Dirt and dust can mask smaller scratches and make it harder to evaluate how deep they go.
- Run Your Fingernail Over The Scratch: A quick way to check depth is by running your fingernail across it. If it catches on a scratch, it’s likely deeper than just surface-level damage.
- Inspect Under Different Lighting: Examine under natural light or use a flashlight at different angles to spot subtle dents or hidden scuffs.
- Check for Paint Transfer: Look for traces of paint from another object (e.g., from another vehicle). This may indicate a collision rather than a minor scuff.
When To Opt For DIY vs Professional Repair
Type of Damage | Suitable for DIY Repair? | Recommended Action |
Surface-Level Scuffs | Yes | Use polishing compounds or repair kits |
Minor Paint Damage | Yes | Sanding, priming, touch-up paint |
Deep Scratches/Gouges | Usually Not | Consider consulting a professional |
Structural Cracks/Dents | No | Seek expert assessment |
Additional Considerations
- If you’re uncertain about how deep a scratch goes after assessing visually, you may test with light sanding over an inconspicuous area of similar damage nearby (if present).
- Keep in mind that older cars with faded paint may require extra blending effort if paint layers are involved.
Understanding these distinctions early will save time and ensure you’re using appropriate tools and strategies tailored specifically to your bumper’s condition. Once confident about assessing severity, you’ll be ready to move on to preparing your materials and starting repairs effectively.
Tools and Materials Needed for DIY Repair
When it comes to repairing bumper scuffs on your own, having the right tools and materials is essential. Using the correct items ensures not only a professional-looking finish but also minimizes the risk of further damage. Below is a comprehensive list of tools and materials you’ll need to successfully carry out a DIY bumper scuff repair.
Essential Tools
- Sandpaper: A variety of grits (e.g., 320, 600, and 2000) for smoothing out scratches, leveling filler, and preparing for painting.
- Plastic or Metal Putty Knife: Useful for applying filler or repair compound evenly across the damaged area.
- Masking Tape and Plastic Sheeting: To protect surrounding areas from paint overspray or accidental sanding.
- Sanding Block: Ensures even pressure while sanding for a smoother surface finish.
- Spray Gun or Aerosol Paint Applicator: For applying paint evenly; aerosol cans are often easier for beginners to use.
Necessary Materials
- Plastic Filler/Putty or Bumper Repair Compound: Specifically designed for automotive plastic, this will fill in any deeper gouges or cracks in the bumper surface.
- Primer (Plastic Adhesion Promoter): Helps new paint bond securely to the repaired area of your bumper. Look for primers labeled specifically for use with plastic parts.
- Touch-up paint must match your car’s color code precisely, which can usually be found on a sticker inside the driver’s door.
- A high-quality clear coat is necessary to seal the paint and add shine.
- Wax & Grease Remover/Isopropyl Alcohol: Essential for cleaning off dirt, oils, or residue before beginning repair work.
- Microfiber Cloths/Rags: Gentle on surfaces but capable of picking up dirt and grease effectively.
Optional but Helpful Items
- Body Filler Glazing Putty: For filling fine scratches that remain after initial sanding. It provides an ultra-smooth finish before painting.
- Helps soften plastic slightly when reshaping minor dents in your bumper.
- Speeds up drying time during various stages of the repair process.
- Used after applying clear coat to achieve a factory-like glossy finish.
Tool/Material | Purpose | Notes |
Sandpaper | Smoothens rough edges around scuff/damage | Use progressively finer grits |
Plastic Filler | Fills deep cracks/gouges | Choose one made specifically for bumpers |
Adhesion Promoter Primer | Ensures proper bonding between bumper surface and paint | Required for plastic surfaces |
Touch-Up Paint with Clear Coat | Matches car’s color while sealing with shine | Double-check vehicle’s color code |
Masking Tape | Protects undamaged areas | Ensure tape adheres securely |
Pro Tips
- Before purchasing materials like touch-up paint, confirm your car’s exact color code—this ensures your repaired section won’t stand out from the rest of your vehicle’s exterior.
- Always choose automotive-grade products; household alternatives may not provide adequate adhesion or durability.
- For a more precise finish when sanding small areas, wrap sandpaper around an eraser or similar object instead of using bare hands.
Having these tools and materials readily available will streamline your DIY repair process while helping you achieve professional-quality results at home without spending extra money at an auto body shop.
Cleaning and Preparing the Damaged Area
Proper cleaning and preparation of the damaged area is a crucial step in achieving a professional-looking bumper scuff repair. Skipping or rushing this process can lead to subpar results, as dirt, grease, or debris can interfere with the repair materials. Here’s a detailed guide to ensure the area is perfectly prepped for repair.
Why Cleaning and Preparing Matters
- Removes Contaminants: Dust, dirt, and grease can prevent adhesion of fillers or paint.
- Identifies Hidden Damage: Proper cleaning allows you to better assess the extent of scratches or scuffs.
- Ensures Smooth Results: A clean, well-prepped surface provides a solid foundation for repair products.
Step 1: Gather Cleaning Supplies
Tools/Materials | Purpose |
Microfiber cloths | For lint-free wiping |
Automotive soap | To remove surface grime |
Isopropyl alcohol (70-90%) | To eliminate grease and oils |
Bucket with water | For rinsing |
Sandpaper (various grits) | To smooth rough edges of scratches |
Step 2: Wash the Area Thoroughly
- Mix automotive soap with water in a bucket according to the instructions on the product label.
- Use a microfiber cloth or sponge to clean the damaged area gently but thoroughly.
- Focus on removing visible dirt and any stubborn particles near the scuffed region.
- Rinse with clean water and dry completely using another microfiber cloth.
Step 3: Degrease with Isopropyl Alcohol
- Dampen a microfiber cloth with isopropyl alcohol (avoid soaking it).
- Wipe down the cleaned area firmly to remove any remaining oils or waxes from previous treatments.
- Allow it to air dry for several minutes before proceeding.
Step 4: Inspect for Rough Edges
Once clean, inspect the scuffed area under good lighting: – Check if there are jagged edges around deep scratches. – Look for peeling paint that may need sanding down.
For minor bumper damage: – Skip heavy sanding unless there are small protrusions or uneven spots. For deeper scratches or gouges: – Use sandpaper starting at 320-grit, then move up through finer grits like 600-grit, ensuring smooth transitions between damaged and undamaged areas.
Step 5: Mask Surrounding Areas (Optional)
If you’re planning to apply filler or paint after preparation: – Use masking tape around undamaged sections of your bumper to protect against accidental scratches during sanding or spills during repairs.
By thoroughly cleaning and preparing your bumper’s surface, you create an ideal base for further repair steps such as filling, priming, and painting. Skipping these essential steps could compromise adhesion quality and overall durability of your DIY repair efforts—making this stage one that deserves extra care and attention throughout your project workflow.
Cleaning and Preparing the Damaged Area
Thorough cleaning and preparation are essential steps to ensure a smooth and professional repair of bumper scuffs. Jumping into the repair process without addressing this step can lead to poor adhesion of fillers or paint, uneven finishes, or even the recurrence of damage. Below is a detailed guide to properly clean and prepare your vehicle’s damaged bumper area.
Why Cleaning and Preparation Matter
- Removes contaminants: Dirt, grime, wax, and grease can interfere with repair materials adhering properly.
- Ensures accurate damage assessment: A clean surface reveals the full extent of scratches or scuffs.
- Prepares for smooth application: Proper preparation prevents uneven surfaces that could hinder paint blending or filler adherence.
Materials Needed for Cleaning
Material | Purpose |
Mild car shampoo | Cleans dirt and grease from the surface without damaging the existing paint. |
Microfiber cloth | Prevents scratches while wiping down surfaces. |
Isopropyl alcohol (70%-90%) | Degreases the surface after initial cleaning for better material bonding. |
Sandpaper (various grits) | Removes loose paint flakes and evens out rough edges near scuff marks (commonly 800-grit to 2000-grit). |
Masking tape | Protects surrounding areas from accidental sanding or chemical exposure during cleaning/preparation. |
Step-by-Step Cleaning Process
- Mix mild car shampoo with water in a bucket.
- Use a soft microfiber cloth or sponge to clean the entire affected area.
- Rinse thoroughly with water, ensuring no soap residue is left behind.
- Dampen another clean microfiber cloth with isopropyl alcohol.
- Gently wipe down the cleaned area to remove any remaining oils, waxes, or residues.
- Avoid excessive rubbing as it may affect undamaged paint layers.
- Use masking tape to protect undamaged sections around the damaged area.
- Cover larger sections (e.g., headlights) with plastic sheeting if necessary.
- Begin sanding around damaged spots using low-grit sandpaper (e.g., 800).
- Gradually move to finer grits like 1200-2000 as you even out edges around scuff marks.
- Wipe away dust frequently with a dry microfiber cloth during sanding.
- Look closely at the prepared surface under good lighting.
- Ensure there are no high spots, remaining dirt particles, or loose paint flakes before proceeding further.
Tips for Best Results
- Always work in a shaded area away from direct sunlight; heat can cause cleaning products or alcohol to evaporate too quickly.
- Replace dirty rags immediately during cleaning sessions—contaminated cloths may reintroduce grease onto cleaned surfaces.
- Take your time when sanding; uneven preparation can lead to visible imperfections once repairs are complete.
By dedicating time and effort to properly clean and prepare your damaged bumper area, you lay a solid foundation for seamless repairs ahead while extending durability post-repair through proper adhesion techniques.
Blending Paint for a Seamless Finish
Achieving a seamless paint finish is crucial when repairing bumper scuffs. Proper blending ensures the repaired area matches the rest of the bumper, making the repair less noticeable and maintaining your vehicle’s aesthetic appeal. This step requires patience, precision, and appropriate tools to ensure professional-quality results.
Why Blending Is Important
- Match color tones for continuity.
- Eliminate visible edges where new paint meets old.
- Maximize the quality of your repair job.
Tools and Materials Required
Tools | Purpose |
Automotive touch-up paint | Matches your car’s factory color |
Clear coat spray | Protects and seals the painted surface |
Sandpaper (variety of grits) | Smooths transitions between surfaces |
Masking tape and plastic sheeting | Keeps surrounding areas free from overspray |
Spray gun (optional) | Provides an even application for larger areas |
Tack cloth | Removes dust and particles before painting |
Step-by-Step Guide to Blending Paint
- Identify your car’s factory color code (usually located in the driver-side door frame or under the hood).
- Purchase touch-up paint that matches this code to ensure consistency.
- Use masking tape and plastic sheeting to cover unaffected parts of your bumper or nearby panels.
- Leave about 4–6 inches around the scuff area for blending.
- Use fine-grit sandpaper (600–800 grit) to sand around the edges of the damaged area.
- Gradually blend into undamaged areas so there’s no hard line between old and new paint layers.
- For deeper damage exposing bare plastic or metal, apply an automotive primer first.
- Allow it to dry completely per manufacturer instructions before proceeding.
- Shake your touch-up spray thoroughly or prepare a spray gun with base coat paint.
- Apply light, even layers starting from inside the scuff area outward toward undamaged sections.
- Let each layer dry before adding additional coats — typically 15-20 minutes between applications.
- For seamless blending, gradually lighten your spray as you move away from the damaged area into surrounding sections.
- Hold your spray can at varying angles to achieve smoother transitions.
- After achieving uniform coverage with a base coat, apply at least two layers of clear coat.
- This adds gloss while protecting against UV damage and future wear. Leave time for each layer to dry fully.
- Once dry, use a soft microfiber cloth or polishing compound to gently buff out minor inconsistencies in texture.
Additional Tips
- Work in a well-ventilated space free of dust particles that could settle on wet paint.
- Practice spraying on scrap material first to perfect your technique before working on your vehicle.
- Avoid using excessive amounts of solvent-based cleaners after repairing, as they may degrade freshly applied clear coat over time.
Following these steps carefully will ensure that any repaired bumper scuffs are nearly invisible while maintaining durability and aesthetic integrity long term.
Final Touches and Maintenance Tips for Long-Lasting Results
Polishing the Area
Once the paint and clear coat have fully cured (typically after 24-48 hours of drying time), polishing is necessary to achieve a smooth, professional appearance.
- Use a fine-grit polish or rubbing compound designed for automotive surfaces.
- Apply the polish with a clean microfiber cloth or polishing pad using gentle circular motions.
- Inspect your work frequently to ensure you don’t over-polish or accidentally damage surrounding areas.
This step helps eliminate minor imperfections, blend repaired sections seamlessly, and restore glossiness to match the rest of the bumper.
Protecting with Wax or Sealant
Adding a protective layer can shield your repair from environmental elements such as UV rays, water, dirt, and road debris.
- Choose an appropriate car wax or ceramic sealant that works well for painted surfaces.
- Apply a thin layer evenly across the entire bumper using an applicator pad or soft cloth.
- Buff off any excess product gently to reveal a shiny finish.
Remember not to wax freshly painted areas for at least 30 days after repair to allow proper curing of paint layers.
Regular Maintenance Practices
- Wash regularly: Use pH-neutral car shampoo and a soft sponge or mitt to avoid scratching.
- Avoid abrasive cleaners: Harsh chemicals can dull paint finishes over time.
- Inspect for new damage: Catching small scuffs early makes them easier—and less costly—to fix.
- Park smartly: Whenever possible, choose parking spots away from high-traffic areas that increase exposure to potential scrapes.
Organizing these tasks into your regular vehicle maintenance routine will significantly extend the life of your repair work.
Maintenance Task | Frequency | Tools/Products Needed |
Polishing | Every 2–3 months | Fine polish/rubbing compound & microfiber cloth |
Waxing/Sealing | Every 4–6 months | Car wax/sealant & applicator pad |
Washing | Weekly/Bi-weekly | Car shampoo & soft sponge/mitt |
Additional Tips for Longevity
To further enhance durability:
– Refrain from high-pressure washing around newly repaired areas immediately after completing repairs. – Address any minor chips promptly before they expand into larger problems. – Consider applying paint protection film (PPF) on vulnerable areas of your bumper.
By following these steps, not only will your DIY bumper repair look professional but it will also stand up well against daily wear and tear—proving that quality results are achievable at home with care and diligence.
Recent Posts

How to Spot Hidden Damage After a Car Accident
Why Hidden Damage Is Common After Collisions Car accidents, whether minor fender benders or major collisions, can leave behind damage that isn’t immediately visible to the naked eye. This hidden damage can pose serious risks if left unchecked, not only affecting the safety of your vehicle but also potentially leading…

How Frame Alignment Restores Vehicle Safety
What Is Frame Alignment in Auto Body Repair Frame alignment is a critical process in auto body repair that ensures the structural integrity of a vehicle after it has been involved in a collision, sustained damage, or undergone any form of impact that affects its frame. Essentially, frame alignment is…
How to Know If Your Bumper Can Be Repaired
Common Types of Bumper Damage Explained Bumpers are designed to absorb and distribute impact energy during collisions, making them a critical component of vehicle safety. Due to their role, bumpers are often the first part of the car to sustain damage in an accident. Understanding the common types of bumper…