How Do I Inspect My Car When the Body Work Is Done?
Is Your Vehicle Clean
Why Cleanliness Matters
- Visibility of Repairs: Dirt or grime can hide imperfections such as scratches, uneven paint surfaces, or dents. A clean car ensures these flaws are more visible.
- Final Finish Assessment: A cleaned vehicle allows you to assess the quality and consistency of the new paint job and any repaired surfaces.
- Professional Standards: A well-cleaned car reflects a repair shop’s professionalism and attention to detail.
Steps to Ensure Your Vehicle Is Clean
- Inspect for Dust or Overspray Residue: Check areas such as windows, mirrors, door handles, and trim for any leftover dust from sanding or paint overspray. These signs may indicate rushed work.
- Check Interior Areas Near Repair Zones: If repairs involved removing parts near windows or interior panels, ensure there’s no leftover debris inside the vehicle. Look for small particulates or scuff marks that may have been caused during disassembly.
- Assess Wheels and Tires for Overspray: If paint overspray reached unintended areas like wheels or tires, it could be due to improper masking during repair work.
- Confirm Detailing Was Done Post-Repair: Reputable shops often perform basic cleaning services after repairs are completed. Ensure that panels are polished and free of smudges.
DIY Cleaning Checklist (If Necessary)
If your vehicle wasn’t returned in satisfactory condition and dirt obstructs your inspection:
– Use a microfiber cloth with mild soap solution to carefully wipe down repaired areas. – Avoid abrasive cleaners that may damage fresh paint. – Rinse with clean water and dry using lint-free cloths.
Cleaning Task | Tools Needed | Notes |
Wipe down exterior panels | Microfiber cloth + soap | Avoid harsh chemicals on newly painted areas |
Check window cleanliness | Glass cleaner + soft towel | Streak-free finish needed to spot issues |
Inspect wheels/tires | Mild detergent + sponge | Remove overspray if present |
Things to Watch Out For During Cleaning Inspections
While verifying cleanliness: – Look for swirl marks left by improper buffing techniques. – Pay attention to residue buildup in crevices around headlights, taillights, door seams, or badges. – Note if fingerprints are visible on freshly painted surfaces; this could indicate inadequate curing time before handling.
Ensuring that your car is returned clean not only aids in identifying repair quality but also demonstrates the level of care taken by the collision repair shop. Always address cleanliness concerns before proceeding with further inspection steps so every detail of their workmanship stands out clearly.
Inspect Your Car’s Repaired Areas
When your car comes back after body repair work, it’s essential to carefully inspect the repaired areas to ensure the job was done correctly. This is not just about aesthetics but also about ensuring safety and durability. Below are steps and guidelines to help you evaluate the work effectively.
1. Examine Surface Alignment
- Panel Gaps: Check if gaps between panels (e.g., doors, hood, trunk) are even and consistent throughout. Uneven gaps could signify improper alignment or poor reassembly.
- Flush Surfaces: Run your hand lightly along the seams where panels meet. They should feel smooth without any noticeable ridges or uneven edges.
- Door Operation: Open and close all doors, including the trunk and hood. They should move smoothly without sticking or requiring excessive force.
2. Check for Paint Uniformity
The new paint on repaired sections should blend seamlessly with the rest of the vehicle.
- Look at your car under various lighting conditions (natural sunlight is best) to spot any color mismatches or differences in texture.
- Inspect for overspray on adjacent panels, windows, tires, or trim pieces—a sign of careless masking during painting.
- Ensure there’s no “orange peel” effect (a bumpy texture resembling citrus skin) on freshly painted surfaces.
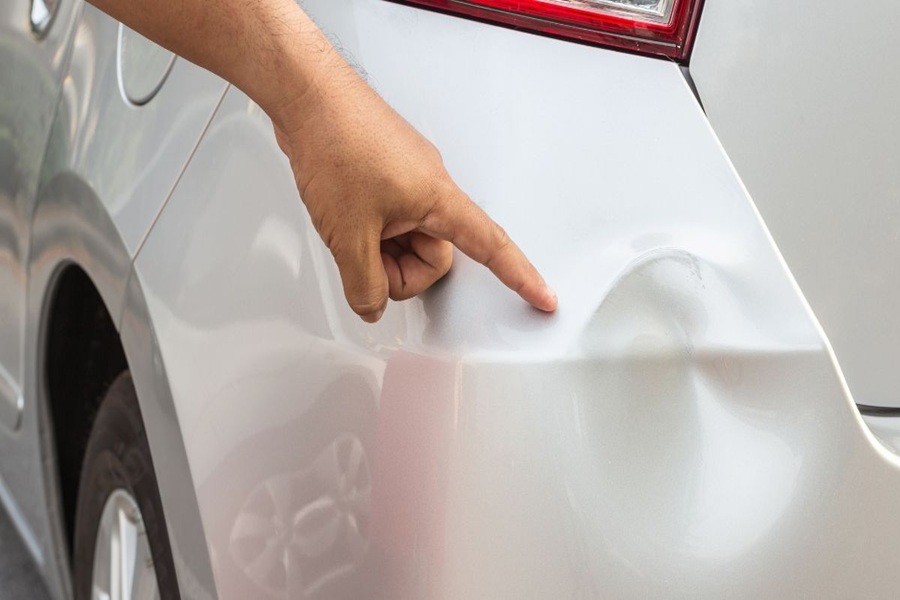
3. Feel for Surface Imperfections
- Rough spots that could indicate leftover sanding marks.
- Small dents, ripples, or waves in what should be smooth metalwork.
- Unfinished edges where repairs may have been rushed.
4. Verify Structural Integrity
- Confirm that chassis or frame repairs were completed as per factory specifications by reviewing documentation from the repair shop.
- Ask about measurements taken during frame straightening—this ensures your car’s structure meets manufacturer tolerances.
- If unsure, consider having a trusted third-party mechanic inspect these areas for added peace of mind.
5. Inspect Seals and Weatherstripping
Element | What to Look For |
Door Seals | Gaps between rubber seals and metal edges; tears in rubber material |
Windshield/Window Edges | Proper adhesive application; no visible gaps where water might seep through |
Trunk Seal | Tight fit with no loose sections |
Poorly installed seals can lead to future issues such as leaks or increased cabin noise.
6. Test Electrical Components
- Headlights, taillights, turn signals
- Power windows and mirrors
- Any sensors (backup cameras or parking sensors)
Use a systematic approach to test every related feature so nothing goes unnoticed.
By thoroughly inspecting each of these aspects after bodywork repair is completed, you ensure not only that your car looks great but also that it remains functional and safe for everyday use.
Inspect Your Car’s Repaired Areas
Look at the Overall Fit and Alignment
- Gaps Between Panels: Check that panel gaps (e.g., between doors, hood, and trunk) are even and consistent. Uneven gaps can indicate improper alignment during repairs.
- Flush Surfaces: Ensure that all panels sit flush with one another. Misaligned panels may not only look bad but can also impact aerodynamics or weatherproofing.
Check for Surface Imperfections
- Dents or Waves: Run your hand gently over the repaired area to feel for any lingering dents or surface irregularities. Even minor imperfections can reduce resale value and aesthetic appeal.
- Sanding Marks: Inspect closely for sanding marks or scratches under the paintwork, which indicate poor preparation before painting.
Verify Seams and Welds
- If welding was part of the repair process, inspect welded seams for neatness and uniformity. Sloppy welds may compromise structural integrity in future collisions or wear down prematurely.
What to Examine | What to Look For |
Gaps Between Panels | Consistency and alignment; no excessive space differences |
Repaired Surfaces | Smoothness; no waves, dents, or sanding marks visible |
Welded Seams | Clean welds with no sharp edges or rust beginning to form |
Evaluate Paint Matching on Repaired Areas
- Color Consistency: Stand back from your car in natural daylight and compare the color of repaired areas with adjacent panels. The paint should blend seamlessly without obvious differences in shade or texture.
- Clear Coat Finish: All painted surfaces should have a uniform shine level indicating a properly applied clear coat finish. Matte spots could mean insufficient application of clear coat.
Test Functional Components After Repairs
If repairs involved functional parts like door handles, latches, or mirrors, test these components thoroughly: – Open and close doors/latches multiple times to check for smooth operation. – Adjust mirrors (manually or electronically) to ensure proper movement. – Test windows if they were affected during repairs.
By carefully inspecting these elements of your vehicle’s repair work using both visual assessment and tactile methods, you can confirm whether professional standards were met. Address any concerns immediately with your repair shop before leaving their premises—this avoids potential disputes later on while ensuring your safety on the road moving forward.
Other Collision Repair Flaws to Look for
1. Alignment Irregularities
One of the most overlooked areas is the vehicle’s alignment after collision repairs. Poor alignment can affect safety and handling over time. Check for:
– Wheel misalignment: Does the car pull to one side when driving on a straight, flat road?
– Steering wheel position: When the wheels are straight, does the steering wheel sit perfectly level?
– Uneven tire wear: Inspect tire treads for signs of uneven wear, which may indicate improper alignment.
2. Panel Gaps and Fitment Issues
Poorly aligned panels are a common issue with collision repairs. Examine the following areas carefully:
– Gaps between panels: Check doors, hoods, and trunks for consistent spacing along all edges. Uneven gaps suggest improper installation or frame misalignment.
– Panel fitment: Ensure all doors, trunk lids, and hoods open and close smoothly without rubbing or sticking.
A quick test: Stand a few feet back from your car and visually inspect the symmetry of all body panels.
3. Paint Overspray or Mismatched Colors
Paintwork is another area prone to flaws after repair work. Look closely for issues like:
– Overspray: Check rubber seals, windows, lights, or inner door edges where overspray might have landed during painting. – Color mismatches: Compare repaired sections with original paint under direct sunlight to spot subtle differences in shade or finish. – Surface texture inconsistencies: The repaired area should match the smoothness of surrounding paintwork — any rough patches could indicate subpar preparation.
4. Surface Imperfections (Scratches or Dents)
Even after repairs are completed, small imperfections like scratches or dents may remain if not addressed properly: – Inspect repaired surfaces at various angles under good lighting conditions. – Run your hand gently over repaired areas to feel for uneven textures or bumps.
If any imperfections persist despite visual checks, don’t hesitate to speak with the repair shop about resolving these issues.
5. Electrical Components & Sensors
Modern cars are equipped with complex technologies that demand special attention after bodywork repairs: – Test headlights, taillights, turn signals, and brake lights — ensure they work without flickering or dimming. – Verify that sensors (e.g., parking sensors or blind spot detectors) function correctly post-repair. – If applicable, assess whether ADAS (Advanced Driver Assistance Systems) features like lane departure warnings or adaptive cruise control remain accurate.
6. Windshield & Glass Repairs
If windshield replacement was part of your repairs: – Check for proper sealing around edges — poorly sealed windshields may cause water leaks over time. – Confirm visibility is clear and free from distortions caused by improper installation techniques.
For minor chips filled during repairs, ensure they appear smooth without compromising strength.
Summary Table
Area to Inspect | Common Issues Found | How to Verify |
Alignment | Steering pull; uneven tire wear | Test-drive on flat roads |
Panel Fitment | Uneven gaps; sticky doors | Open/close panels; visual check |
Paint Finish | Overspray; mismatched colors | View under natural light |
Surface Condition | Scratches; unfinished dents | Hand inspection + close-up view |
Electronics | Malfunctioning sensors/lights | Test each feature/system |
Windshield Installation | Improper sealing; visual distortions | Examine edges + drive in rain |
Performing this rigorous check ensures peace of mind regarding both safety and aesthetics after collision repair work on your vehicle.
How Do I Find Auto Paint Job Mistakes
When your car has undergone bodywork that includes paint repairs, assessing the quality of the paint job is crucial. A poorly executed paint job doesn’t just affect the aesthetics of your vehicle but may also indicate a lack of attention to detail in other aspects of the repair. Below is a guide to help you identify auto paint job mistakes so you can ensure high-quality results.
Assessing Paint Color Matching
One of the most common issues in auto body repairs is mismatched paint. Modern vehicles use complex color codes, and improper mixing can result in a noticeable difference between repaired and original areas.
Key steps to check for color matching: – Compare adjacent panels: Look at areas where the new paint meets the original finish (e.g., doors meeting fenders). Any disparities will be apparent here. – Inspect under natural light: Artificial lighting in garages or shops can distort colors. Examine your vehicle outside during daylight hours. – Check various angles: Walk around your car and observe from multiple perspectives. This helps reveal subtle mismatches that aren’t visible from one viewpoint.
Surface Texture Consistency
The texture of a car’s surface should feel even across all panels, whether repaired or untouched. Poor application techniques, such as insufficient sanding or uneven spraying, can leave behind imperfections.
What to look for: – Orange peel effect: This term describes uneven surfaces that resemble the skin of an orange. It indicates improper spraying or curing. – Overspray: Excessive spray on nearby panels or trim shows a lack of care during painting. – Runs and drips: These are streak-like marks caused by excessive paint application. – Rough spots or bubbles: Debris trapped in wet paint causes bumps or pits.
Run your hand lightly over painted surfaces to detect irregularities if they aren’t immediately visible.
Inspect Clear Coat Application
The clear coat is vital for protecting both the color layer and underlying metal from damage. Its absence or uneven application compromises durability and shine.
Signs of issues with clear coat: – Dull areas: Parts that appear less glossy could have been missed with clear coat application. – Peeling edges: This indicates poor adhesion between layers. – Swirl marks or scratches: Improper buffing after applying clear coat can leave unsightly swirls behind.
Look for Masking Issues
Masking tape is typically used during painting to protect parts of the vehicle not being repainted (e.g., windows, headlights). Poor masking is often evident after repairs.
Potential masking problems: – Paint on areas like rubber seals, chrome trim, or glass indicates careless tape placement.
– Uneven boundaries where one panel transitions to another suggest rushed work without proper taping.
Compare Before-and-After Photos
If possible, ask for photos taken before and during repairs so you can compare them with the finished product: – Ensure dents, scratches, and other prior damage were fully addressed before painting began. – Verify that repaired areas blend seamlessly with surrounding sections without obvious signs of alteration.
Checklist for Paint Job Inspection | Notes |
Color consistency across panels | Under natural light |
Surface texture uniformity | Smooth without blemishes |
Clear coat integrity | Even gloss everywhere |
Masking precision | No overspray on unintended parts |
By thoroughly inspecting these elements after receiving your car from a repair shop, you’ll be better equipped to identify any faults while ensuring satisfaction with their work before driving away.
Other Collision Repair Flaws to Look for
When inspecting your car after bodywork, it’s crucial to look beyond the obvious. While dents and paint issues often catch your attention first, other areas might reveal flaws that could impact your car’s functionality or appearance over time. Below are key aspects to evaluate when assessing the quality of collision repair work.
1. Panel Alignment
- Inspect seams and gaps: Use a ruler or your fingers to gauge whether gaps between doors, hood, trunk, and fenders are consistent.
- Open and close moving parts: Doors, the trunk lid, and the hood should open smoothly without sticking or making unusual noises.
If there’s noticeable misalignment, it can affect aerodynamics and cause water or air leakage down the road.
2. Check for Overspray
- Look closely at edges near windows or headlights for a rough texture.
- Run your fingers along plastic trim pieces—paint residue might feel gritty.
Overspray suggests a lack of precision during painting and may require correction.
3. Surface Imperfections
- Observing under natural sunlight from different angles to detect imperfections like uneven texture, ripples, or sanding marks.
- Gently running your hand along the surface to feel for bumps or rough patches.
Such issues may indicate rushed prep work before painting.
Common Surface Issues | Cause |
Orange peel | Poor paint application |
Sanding marks | Insufficient surface prep |
Bubbles | Moisture trapped in paint |
4. Inspect Headlights and Taillights
- Check that lights are flush with surrounding panels.
- Turn them on to confirm proper alignment and full functionality (e.g., no flickering).
Faulty light installation can lead to visibility issues while driving.
5. Undercarriage Inspection
- Look underneath for any bent metal components or missing fasteners.
- Check for fluid leaks from damaged hoses or seals.
This inspection ensures structural safety hasn’t been compromised during repairs.
By thoroughly assessing these less obvious areas alongside more visible repairs, you’ll ensure your car is restored not only aesthetically but also functionally. A careful eye now can save future costs associated with overlooked flaws in collision repair work.
Other Collision Repair Flaws to Look For
Alignment of Panels and Gaps
- Check all gaps: Inspect the spaces between doors, the hood, fenders, trunk lid, and bumpers. These should be uniform and consistent on both sides.
- Test panel alignment: Run your hand along the seams where panels meet. Misaligned panels may feel raised or uneven.
- Door operation: Open and close all doors, including the trunk and hood. They should latch smoothly without requiring extra effort.
Quality of Fasteners
Fasteners hold various components together securely after repair work is completed. Poorly installed or missing fasteners can lead to long-term issues.
- Missing screws, clips, or bolts.
- Loose fasteners causing rattling or instability.
- Mismatched fasteners (e.g., screws that don’t match OEM specifications).
Hidden Damage
While visible surfaces may look flawless, underlying damage beneath repaired areas could compromise your vehicle’s safety and performance.
- Reinforcement bars behind bumpers.
- Frame straightening performed after significant collisions.
- Use a flashlight to examine beneath repaired sections for any dents or bends in support structures.
Paint Overspray
Paint overspray occurs when excess paint inadvertently settles on nearby surfaces during a repair job. It’s a common sign of rushed or careless paintwork.
- Windows, mirrors, headlights/taillights.
- Wheel wells or tires.
- Door handles and trim pieces.
If you notice overspray in these zones, it might indicate a lack of proper preparation during painting.
Electrical System Issues
Collisions can damage electrical systems that are often overlooked during repairs.
- Headlights, brake lights, indicator lights.
- Window controls and side mirror adjustments (if powered).
- Sensors like parking assistance or lane departure warning systems (if equipped).
Faulty wiring may require immediate attention from a professional electrician.
Interior Inspection
- Check upholstery: Ensure debris wasn’t left behind by technicians during repairs.
- Dashboard electronics: Verify that no error messages appear on the dashboard related to airbags or other safety features affected in the collision.
Sometimes internal components need recalibration after an accident; verify everything is functioning as intended.
Test Drive Evaluation
- Listen for unusual sounds like rattling panels or wind noise around windows caused by improper sealing.
- Ensure smooth handling; misaligned wheels after accidents can affect steering performance significantly.
Take note of any vibrations at certain speeds as these might stem from unresolved damage in suspension components following a collision.
By carefully evaluating these aspects with patience and attention to detail, you’ll have confidence that your car is fully restored—not just cosmetically but also structurally—and ready for safe use again.
Recent Posts

How to Spot Hidden Damage After a Car Accident
Why Hidden Damage Is Common After Collisions Car accidents, whether minor fender benders or major collisions, can leave behind damage that isn’t immediately visible to the naked eye. This hidden damage can pose serious risks if left unchecked, not only affecting the safety of your vehicle but also potentially leading…

How Frame Alignment Restores Vehicle Safety
What Is Frame Alignment in Auto Body Repair Frame alignment is a critical process in auto body repair that ensures the structural integrity of a vehicle after it has been involved in a collision, sustained damage, or undergone any form of impact that affects its frame. Essentially, frame alignment is…
How to Know If Your Bumper Can Be Repaired
Common Types of Bumper Damage Explained Bumpers are designed to absorb and distribute impact energy during collisions, making them a critical component of vehicle safety. Due to their role, bumpers are often the first part of the car to sustain damage in an accident. Understanding the common types of bumper…