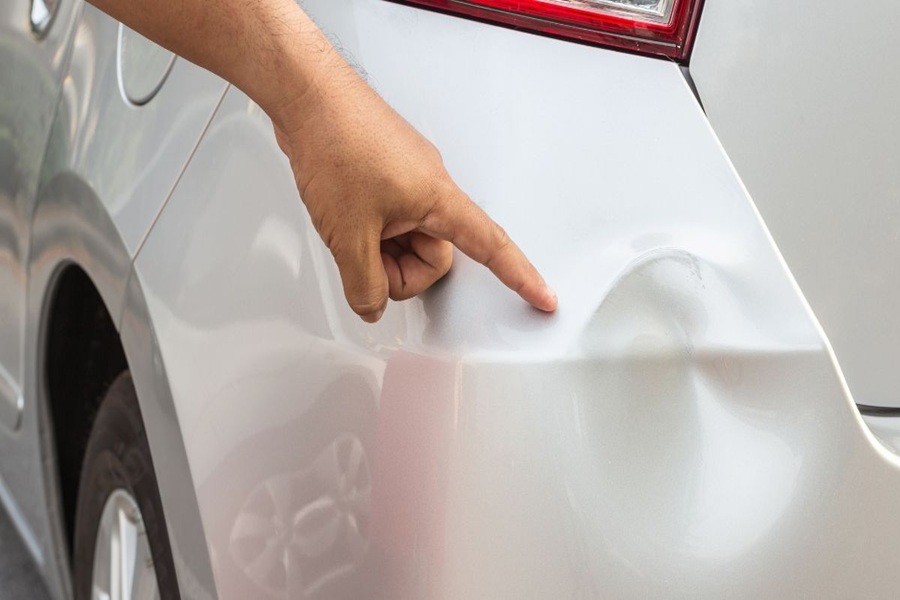
Damage Assessment and Estimate (1–2 Days)
The first step in the collision repair process is damage assessment and providing an estimate for the repairs. This stage generally takes 1–2 days and involves a thorough evaluation of your vehicle’s condition to identify visible damage, assess repair needs, and provide an initial cost estimate.
What Happens During Damage Assessment?
- Vehicle Inspection: The repair shop will visually inspect your car to document all noticeable damages caused by the collision. This includes external dents, scratches, broken parts, and other visible issues.
- Photographic Evidence: Technicians often take photos of your vehicle from multiple angles as part of the documentation process.
- Input from Vehicle Owners: You may be asked to describe how the accident occurred or if you noticed any mechanical or performance issues after the incident.
- Use of Software Tools: Many collision repair facilities use advanced estimating software to analyze damage and calculate repair costs based on labor, materials, and parts.
Role of Insurance Companies
Most auto insurance providers are involved during this step if you’re filing a claim. Here’s what you can expect: – Approval Process: The repair shop submits their estimate to your insurer for approval before starting work. This may involve back-and-forth communication between the shop and insurance adjusters. – Adjuster Review: In some cases, an insurance adjuster may need to inspect your car in person before approving the claim.
Why Is Accuracy Important Here?
A precise assessment ensures that no essential repairs are overlooked. It also prevents unexpected delays later in the process when hidden damages come to light during disassembly or repairs.
Key Tasks | Estimated Timeframe |
Vehicle inspection | 30 minutes – 1 hour |
Estimate generation | 1–2 hours |
Insurance approval | Varies (often within 24–48 hours) |
Tips for Vehicle Owners During This Stage
- Keep any documentation from the accident handy, such as police reports or photos taken at the scene.
- Inform your insurer promptly about the incident; this can speed up claim processing.
- Ask questions if you don’t understand parts of the estimate—reputable shops will be happy to explain each cost item.
This stage sets the foundation for a smooth repair process by identifying necessary work upfront. While it usually lasts only a day or two, its importance cannot be overstated.
Disassembly and Hidden Damage Inspection (1–3 Days)
After the initial damage assessment and estimate, the next critical step in the collision repair process is disassembly and hidden damage inspection. This phase typically takes between one to three days, depending on the complexity of the damage and the type of vehicle involved. It goes beyond surface-level damage to uncover any underlying issues that may not have been visible during the initial evaluation.
Purpose of Disassembly
- Accurate Damage Assessment: Hidden structural or mechanical issues are identified.
- Efficient Repairs: Knowing all repair needs upfront allows for better planning and faster execution.
- Cost Control: Uncovering additional damage early prevents unexpected costs later in the repair process.
Identifying Hidden Damage
- Structural Integrity: Frame alignment and any signs of bending or stress.
- Mechanical Systems: Suspension, engine mounts, wiring harnesses, and other internal systems that may have been impacted by the collision.
- Safety Features: Sensors for airbags, lane assist systems, or cameras that could be malfunctioning due to impact.
For example, what might initially appear as a minor dent on a bumper could hide significant damage to reinforcement bars or underlying brackets once inspected during disassembly.
Communication During This Stage
- Ensure you’ve discussed potential additional costs with your shop beforehand.
- Ask for detailed explanations of any new findings if they arise.
Tools Used in Disassembly
Tool | Purpose |
Plastic pry bars | Safely removes trim pieces without scratching surfaces |
Spot weld cutters | Removes panels joined by welds without damaging surrounding materials |
Diagnostic scanners | Identifies hidden electrical issues within sensors or wiring systems |
These tools allow technicians to work efficiently and minimize added wear-and-tear on your car.
Why This Step Matters
Skipping this stage—or rushing through it—can lead to incomplete repairs or safety risks down the line. For instance, a misaligned frame left undetected could compromise vehicle handling while driving. Addressing hidden issues early ensures your car is restored not just cosmetically but also structurally and mechanically.
By taking time for thorough disassembly and inspection upfront, repair shops set themselves up for a smoother overall process while ensuring customer safety remains a priority. The attention given here ultimately reduces delays during subsequent steps like body work or paint refinishing while avoiding costly rework later in the timeline.
Structural and Frame Repairs (2–5 Days)
The structural and frame repair stage is one of the most critical steps in the collision repair process. During this phase, technicians focus on restoring the vehicle’s structural integrity, ensuring it meets manufacturer specifications and safety standards. This stage not only affects the car’s safety but also how well it drives after repairs, making precision a top priority.
What Happens During Structural and Frame Repairs
- Measuring and Straightening: Advanced computerized measuring systems are used to assess the extent of misalignment in the frame or unibody. Technicians then utilize specialized equipment, such as frame alignment machines, to straighten and restore it to factory dimensions.
- Welding and Reinforcement: If certain sections of the frame are severely damaged or corroded, technicians may need to weld additional support structures or replace portions entirely. High-quality materials are utilized to ensure durability.
- Inspection for Safety Standards: Once repairs are complete, technicians double-check that all adjustments meet both manufacturer guidelines and safety regulations.
Common Types of Damage Repaired at This Stage
- Designed to absorb impact energy during crashes, crumple zones may need straightening or complete replacement.
- Impacts from either side can twist a vehicle’s frame out of alignment, affecting overall stability.
- If suspension mounting points on the frame shift during a collision, they must be restored so steering remains precise.
Tools Used in Frame Repair
Tool/Equipment | Purpose |
Frame Straightening Machines | Realign bent frames accurately |
Computerized Measuring Systems | Ensure precision during adjustments |
MIG/TIG Welders | Securely reinforce weakened areas |
These tools allow technicians to achieve results that adhere closely to factory specifications.
Importance of Structural Repairs for Vehicle Longevity
- Misaligned frames may lead to uneven tire wear or poor handling.
- Undetected weak points could compromise crash protection in future accidents.
- Vehicles with unresolved structural damage often experience reduced resale value.
It’s crucial for car owners to choose a reputable auto body shop with trained professionals who use advanced equipment when handling these complex repairs.
How You Can Help Expedite This Step
- Communicating clearly with your repair shop about any unusual noises or handling issues post-collision.
- Approving necessary changes promptly if additional hidden damage is discovered during this stage.
Understanding what happens during structural repairs can give you peace of mind knowing your car will be safe, functional, and restored to original specifications once this step is complete.
Body Work and Panel Repairs (3–7 Days)
Overview of the Process
- Dent Removal: Using specialized tools, technicians remove dents from body panels. For minor dents without paint damage, techniques like Paintless Dent Repair (PDR) might be used.
- Panel Replacement: Severely damaged panels that cannot be repaired are replaced with new ones that match the specifications of your vehicle.
- Straightening and Alignments: Misaligned panels are adjusted to ensure proper gaps between doors, fenders, and other sections.
- Surface Preparation: Before moving on to refinishing, technicians smooth out surfaces with sanding techniques and apply fillers where necessary.
Common Tools Used
A variety of equipment is employed to complete body repairs effectively: | Tool Name | Purpose | |———————|—————————————| | Dent Pullers | For removing dents from metal panels | | Sander Machines | To smooth surfaces | | Body Filler Spreaders| For applying and leveling filler | | Panel Alignment Gauges | Ensures proper alignment |
Challenges During Body Work
The complexity of this phase can vary based on a few factors: 1. Type of Damage: Large-scale panel replacements take longer than minor dent repairs. 2. Vehicle Model: Specialty or luxury vehicles may require specific materials or harder-to-source replacement parts. 3. Weather Conditions (if working in less controlled environments): Extreme temperatures can affect adhesives or body fillers used during repairs.
Quality Assurance in Body Repairs
To ensure premium results during this stage: – Technicians frequently measure gaps between panels for consistency. – Multiple inspections are conducted throughout repair steps to verify accuracy. – High-quality body fillers and materials are used for durability.
Tips for Car Owners During This Stage
As your vehicle undergoes body work repairs, here’s how you can stay involved: – Request regular updates from your collision center about progress timelines. – Confirm that replacement parts (if any) meet Original Equipment Manufacturer (OEM) standards rather than aftermarket alternatives unless you prefer otherwise.
This stage is crucial in restoring both aesthetics and functionality after an accident. Once complete, your car will start looking closer to its pre-collision state—setting the stage for painting and final refinishing touches in subsequent phases.
Paint and Refinishing (2–4 Days)
The paint and refinishing stage is one of the most critical steps in the collision repair process. This step not only restores the vehicle’s aesthetics but also protects the repaired surfaces from environmental factors like rust, moisture, and UV damage. A professional approach to painting ensures a seamless match with the original finish, making it appear as though no damage ever occurred.
Preparing for Paint Application
- Sanding and Smoothing: Technicians carefully sand any uneven surfaces or rough edges left from bodywork repairs to ensure a smooth base.
- Cleaning and Masking: The vehicle is thoroughly cleaned to remove dust, grease, or contaminants that could affect paint adhesion. Non-repaired areas are masked off to protect them during the painting process.
- Priming: A layer of automotive primer is applied to create a strong bond between the bare metal or repaired panels and the paint. Primer also helps ensure an even finish.
Color Matching Process
- Paint Type: Whether it’s metallic, pearlescent, or solid colors.
- Aging Effects: Sun exposure and wear can slightly alter a car’s original tone over time.
- Blending Techniques: To seamlessly transition between old and new paint, technicians may blend the new color into adjacent panels.
Paint Application
- Base Coat Application: The base coat provides the vehicle’s main color.
- Clear Coat Finish: A transparent clear coat is applied on top of the base coat to add shine, depth, and protection against scratches and fading.
Each layer of paint requires time to cure properly before proceeding to the next step.
Curing and Polishing
- Any imperfections (e.g., spots or streaks) are corrected through sanding.
- The surface is polished to restore its glossy appearance.
This final step ensures that your vehicle looks flawless when viewed from any angle.
Quality Assurance During Paintwork
Throughout this stage, technicians conduct regular quality checks to ensure consistency in color application, texture, and overall finish. Attention is given not just to visible surfaces but also hidden areas like door jambs or undersides of panels for thorough coverage.
The paint and refinishing stage combines technical expertise with artistry to deliver a result that meets both aesthetic standards and practical durability requirements—essential aspects for restoring your vehicle after collision repairs.
Final Inspection and Delivery (Same Day)
The final inspection and delivery stage is one of the most critical phases of the collision repair process. At this point, every aspect of the repair work is thoroughly examined to ensure it meets both safety standards and aesthetic expectations. Here’s what happens during this stage and what you should anticipate as a vehicle owner.
The Final Inspection Checklist
- Quality Control Review:
Experienced technicians or supervisors inspect the repaired areas, ensuring that structural integrity, alignment, and finish match manufacturer specifications. - Paint Quality Check:
The paint finish is inspected for consistency in color, texture, and application. Any imperfections (like overspray or uneven spots) are addressed at this stage. - Reassembly Verification:
All components that were disassembled earlier in the repair process—such as bumpers, trim pieces, mirrors, or lights—are inspected to confirm they’ve been reinstalled correctly. - Safety System Testing:
Modern vehicles often include advanced safety features such as sensors, cameras, and automated systems. These are tested to ensure they’re functioning properly after repairs.
Cleaning and Presentation
- Vacuuming the interior.
- Washing the exterior.
- Polishing repaired panels.
This attention to detail helps restore your car’s appearance and ensures you receive it in pristine condition.
Customer Walkthrough
- Technicians or representatives will explain what was done during each phase of the repair process.
- They’ll highlight any replaced parts or special considerations taken during repairs.
- You’ll have an opportunity to inspect the vehicle yourself before taking it home.
Make sure to examine both repaired areas and unrelated parts of your car for any issues before leaving. If anything seems amiss or unsatisfactory, let the shop know immediately so corrections can be made.
Delivery Timeframe
Most shops aim for same-day delivery once inspections are complete. Be aware that delays could occur if issues are found during quality checks that require additional work.
Stage | Estimated Timeframe |
Final Inspection | 1–2 hours |
Cleaning/Detailing | 1–2 hours |
Customer Walkthrough | 15–30 minutes |
Tips for Vehicle Pickup
- Bring copies of any relevant paperwork (e.g., estimate reports).
- Inspect both repaired areas and unrelated parts carefully for new damage.
- Test essential systems like lights, brakes, windows, and electronics before leaving.
By taking an active role in this final step of collision repair, you can drive away knowing your vehicle has been restored both functionally and aesthetically.
Tips for a Smooth Collision Repair Experience
Navigating the collision repair process can be overwhelming, especially if it’s your first time dealing with vehicle damage. However, there are steps you can take to ensure the process goes smoothly and efficiently. Following these practical tips will help minimize stress and keep you informed every step of the way.
Choose a Reputable Repair Shop
Selecting the right auto body shop is critical to your experience:
– Look for certified repair facilities, such as those with I-CAR Gold Class or ASE certifications.
– Read online reviews and ask friends or family for recommendations.
– Verify that the shop works with your insurance company and offers warranties on repairs.
Communicate Clearly and Often
Maintaining open communication with your repair shop ensures everyone is on the same page:
– Provide detailed information about the accident when dropping off your vehicle.
– Ask for updates on progress, especially if repairs take longer than expected. Many shops offer text or email notifications to keep customers updated in real time.
– Ensure you understand any paperwork before signing, including estimates and agreements regarding supplemental costs for hidden damages uncovered during repairs.
Understand Your Insurance Coverage
Before starting repairs, it’s important to confirm what’s covered by your insurance policy:
– Find out whether your policy includes coverage for rental cars while repairs are being completed.
– Verify whether you’re responsible for paying a deductible upfront. – Check if there are limits on where you can take your car for repairs (some insurers have preferred networks).
Prepare for Potential Delays
Although repair shops strive to stick to timelines, unexpected delays can occur due to parts availability or additional damage found:
– Ask early about potential delays caused by sourcing specific parts or dealing with rare vehicles. – Build flexibility into your schedule in case repairs take longer than planned.
Inspect Your Vehicle Upon Pickup
Once repairs are completed and the final inspection is done by the shop, it’s crucial that you double-check their work before driving away:
1. Examine repaired areas in good lighting to ensure color matching and quality of finish. 2. Test all major functions, such as lights, sensors, windows, and door handles. 3. Confirm there are no lingering issues like strange noises or improper alignment when driving off.
Table: Key Questions to Ask Your Repair Shop
Question | Why It Matters |
Is my estimate itemized? | Transparency helps avoid unexpected charges |
Do you use OEM (Original Equipment Manufacturer) parts? | Ensures high-quality parts are used |
Will my car have a warranty after repairs? | Provides peace of mind about workmanship |
How will I be updated on progress? | Helps manage expectations during lengthy repair processes |
By following these tips and staying proactive throughout each phase of collision repair, you’ll feel more confident about having your vehicle restored properly while minimizing hassle along the way.